Batman: Arkham City
Enigma Conundrum

Design Overview
Summary:
The objective of this project was to create an original Riddler Challenge level that adheres to the mechanics, environmental storytelling, and logic flow of Batman: Arkham City.
In this level, the game requires the player to think in layers: from recognising specific objects and knowing which Batman gadget to use to locating themselves without getting lost in the life-size puzzle.
Theme:
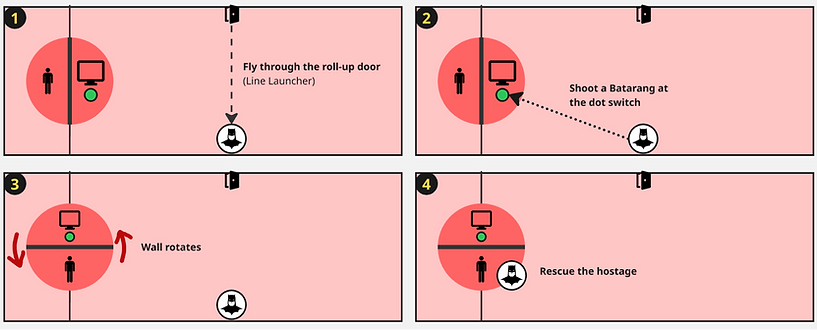
Normally, in the Riddler’s challenge, the question mark switches help the player to solve the puzzles by activating or deactivating certain objects or devices. This time, however, the player has to form the hook part of the question mark first before hitting the bottom dot switch with a Batarang.
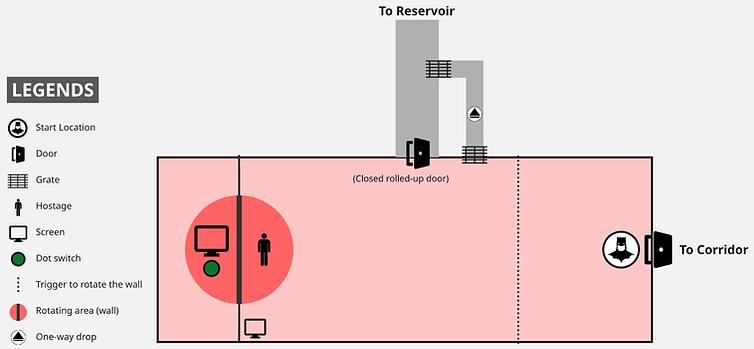
Level Map

Phase 1: Introduction (Puzzle)
Level summary:
In this first area, the idea is to introduce a simple puzzle that builds on the player’s use of the Batarang. After entering the corridor and turning left, the player finds a locked door and a panel puzzle made up of seven circular pieces. Each panel has a switch that rotates it 90 degrees when hit, so the player needs to experiment with the rotations to align the circuit lines into a question mark shape.
Once everything connects, the puzzle lights up in green and activates a final switch below, which can be hit with a Batarang to unlock the door and move forward.
Design point:
A tutorial of completing a question mark symbol.
-
How to complete the hook (top part) of the question mark.
-
The whole question mark will light up when the top part is complete.
-
Hitting the non-lit-up dot switch does not do anything.


Phase 2: A Surprise (Narrative)
Level summary:
Move on to the next area. The idea is to shift the focus toward tension and narrative beats.
As the player enters the room, a cutscene plays with a hostage calling for help. However, once the player moves closer, the wall at the end rotates, hiding the hostage and revealing a set of screens instead.
These screens show top-down views of rooms in the reservoir, along with one displaying the previous puzzle as a subtle hint. At this point, the player has no clue what the screens represent.
After discovering the hidden grate and entering the tunnel, the player eventually exits into a corridor that leads toward the reservoir.
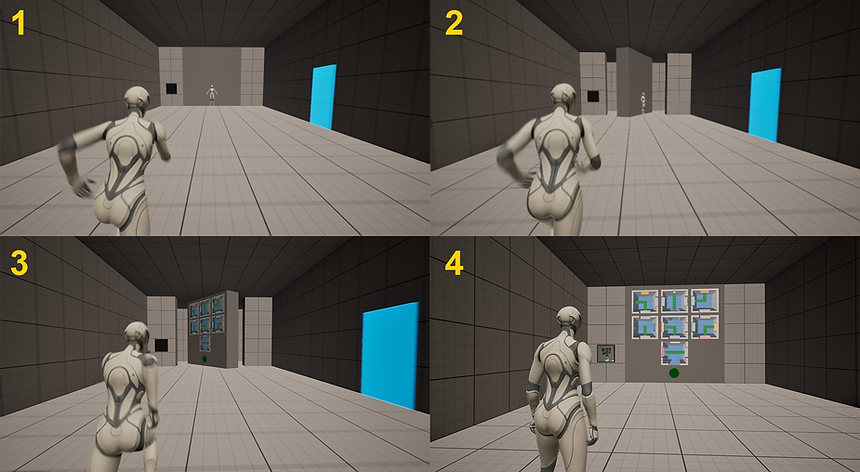
Blockout screenshots:
The wall rotates when the player approaches the hostage:
Design point:
-
Have the player understand that this is a hub room, which they should revisit later to rescue the hostage.
-
The 7-screen setup with an unlit dot switch below should remind the player of the puzzle they just solved.
-
An additional screen is located on the side, showing the completed puzzle from the corridor, giving the player a hint of “you should replicate this.”

Phase 3: Life-size Question (Puzzle)
Level summary:
In the third area, the game scales up the earlier puzzle into something more physical and spatial. When the player enters the reservoir, they can see a network of seven rooms connected by bridges, essentially a life-size version of the puzzle they encountered before. The goal is to rotate and align these bridges so everything connects into a complete path.
To start, the player glides into one of the open rooms, which kicks off the puzzle. Each room has a different way of rotating its bridge, using familiar tools but in slightly varied ways, encouraging the player to experiment and read the space. (e.g., use Remote Electrical Charge at the generator to rotate the bridge, or shoot a Remote Control Batarang and guide it through an electric current, and then hit the fuse box) As the player progresses and connects all the bridges, the structure gradually comes to life, with lights activating across the network.
Once everything is aligned, a pressure pad on the observation deck powers up. The player then uses their traversal tools to get back up, step on the pad, and briefly open the way back to the Main Room, requiring a quick and precise move to make it through before the door closes by using a Line Launcher.
Blockout screenshots:
-
The puzzle in the reservoir, standing at the edge of the observation deck:
-
Solving the puzzle in the gigantic puzzle area:
-
The player should be able to see a big question mark (green part) if the bridges are in the correct direction:
Design point:
-
Deliver the concept of the contrast between small and big puzzle sizes.
-
Three different ways to rotate the bridge, challenging the player’s puzzle thinking.
-
Allow the player to check their current progress anytime. (top-down view)


Phase 4: Hostage Rescued (Narrative)
Level summary:
For the final phase, the goal is to bring everything together and pay off the earlier clues. When the player returns to the Main Room, the screens now form a clear question mark shape, along with the dot switch below, which is finally activated. Hitting the switch with a Batarang triggers the wall to rotate, revealing the hostage. From there, the player can step in and complete the rescue.
Design point:
When the wall rotates, rotate it only 90 degrees to prevent the player from being pushed to the other side by the wall.

Flexible Difficulty Adjustment
For this level, you can adjust the difficulty easily by simplifying or adding more layers to it.
Corridor Puzzle:
-
To lower the difficulty:
-
If the circuit on the panel is in the correct direction, it will light up, instead of requiring all circuits to be connected.
-
-
To raise the difficulty:
-
All circuits on the panels are in the incorrect direction by default.
-
Hide the puzzle behind an explosive wall, and require the player to use the detective mode to check the surroundings.
-
Reservoir Puzzle:
-
To lower the difficulty:
-
Add walls between the rooms and the glass panel ceilings (except the 2 bottom corner safe-standing areas) to create a more linear path, avoiding players’ confusion about where they should go.
-
When the bridge is rotated in the correct direction, the light on the bridge will turn on; instead, all bridges are connected.
-
-
To raise the difficulty:
-
Remove all glass panel ceilings and the walls between the rooms, creating a more open space, in which the player may get disoriented in the puzzle area.
-
Once the player drops into the puzzle area, there will be a timer counting down, and the toxic sewage will slowly rise. If the sewage level is over the room, the player fails.
-
Requires more different kinds of gadget usage.
-