Riddler Challenge

Design Overview
Summary:
In this level, the game requires the player to think in layers: from recognising specific objects and knowing which Batman gadget to use to locating themselves without getting lost in the life-size puzzle.
There are 2 similar puzzles in this challenge: a small one and a big one. The goal of the puzzle is the same, but the way to solve it is different. The level could be broken down roughly into 4 phases:
-
Introducing the main theme and puzzle. (puzzle)
-
Locate the hostage. (narrative)
-
Solve the bigger puzzle. (puzzle)
-
Rescue the hostage. (narrative)
Theme:
Normally, in the Riddler’s challenge, the question mark switches help the player to solve the puzzles by activating or deactivating certain objects or devices. This time, however, the player has to form the hook part of the question mark first before hitting the bottom dot switch with a Batarang.
Note: To standardise terminology, the circular switch (the dot portion of the question mark) will be referred to as the "dot switch" in this document.

Level Map

Phase 1: Introduction (Puzzle)
Location: Corridor
Level walkthrough:
-
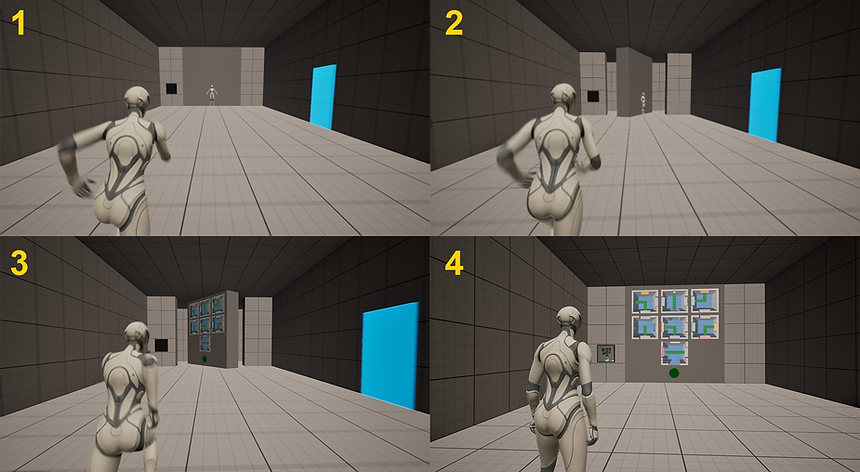
Go through the door and enter the corridor, make a left turn to see the door and the puzzle.
-
In the puzzle, there are 7 circular panels with inactive circuits on them, and each has a switch in its centre that rotates the panel when hit.
-
To solve the puzzle, use Batarang to hit the switches on the panels. Each time a switch is hit, its panel rotates 90 degrees clockwise.
-
Connect all the circuit lines to form a question mark hook.
-
Once complete, the circuit will light up in green, as well as the dot switch below the panels, which can unlock the door. Hit it with a Batarang to unlock it.
Note: The rotating panel mechanic can be found in Batman: Arkham Knight - Riddler Trial #3 - Numeracy 101.
Design point:
A tutorial of completing a question mark symbol
-
How to complete the hook (top part) of the question mark.
-
The whole question mark will light up when the top part is complete.
-
Hitting the non-lit-up dot switch does not do anything.


Phase 2: A Surprise (Narrative)
Location: Main Room
Level walkthrough:
-
Once the player enters the room, a cutscene of the hostage crying for help plays.
-
Move forward to 1/3 of the room, and then the wall at the end rotates 180 degrees, hiding the hostage and revealing the screens.
-
Each screen displays a top-down view of a room in the reservoir, with an additional screen showing the puzzle the player just completed in the corridor as a hint.
-
Use detective mode to locate the grate, which can be torn open, and enter the tunnel.
-
After a few steps, the player drops down, and it’s a one-way fall that the player cannot go back up.
-
Leave the tunnel at the end and enter the corridor that leads to the reservoir.
Blockout screenshots:
The wall rotates when the player approaches the hostage:
Design point:
-
Have the player understand that this is a hub room, which they should revisit later to rescue the hostage.
-
The 7-screen setup with an unlit dot switch below should remind the player of the puzzle they just solved.
-
An additional screen is located on the side, showing the completed puzzle from the corridor, giving the player a hint of “you should replicate this.”
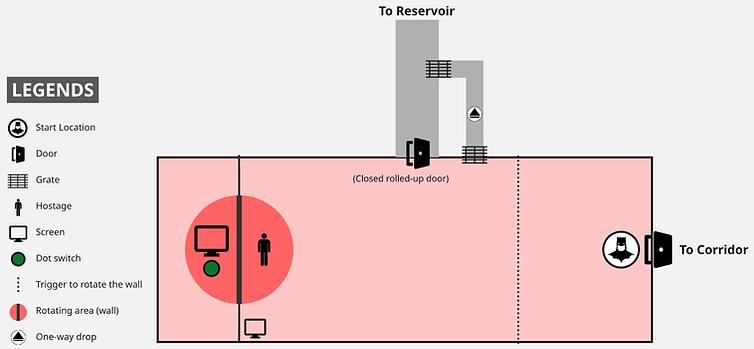

Phase 3: Life-size Question (Puzzle)
Location: Reservoir
Level walkthrough:
Enter the reservoir, and the player can see 7 rooms connected by bridges. A life-size puzzle compared to the one in the corridor earlier.
-
The goal is to rotate the bridges and connect them altogether.
-
At the edge of the deck, there’s a pressure pad that controls the roll-up door behind, leading back to the Main Room, but it’s inactive now.
-
Glide into any room without the glass-panel ceiling to start the puzzle.
-
There are 3 types of rooms in this puzzle. Each has its own way to rotate the bridge.
-
Question Mark Switch (2 rooms)
Shoot a Batarang at the switch to rotate the bridge 90 degrees clockwise.
-
Generator (4 rooms)
Use Remote Electrical Charge to rotate the bridge clockwise or anticlockwise.
-
Fuse box (1 room)
Shoot a Remote Control Batarang and guide it through an electric current, and then hit the fuse box to rotate the bridge. This is a one-time event.
-
-
Once all the bridges are connected, the small lights curled on the bridges will light up, and so will the pressure pad.
-
Use Batclaw to get back onto the observation deck.
-
Step on the activated pressure pad, and the roll-up door to the Main Room behind will open. Use a Line Launcher and aim at the door, then quickly fly through before the door closes, and get back to the Main Room.
Note:
-
If you drop into the toxic sewage, you will be respawned from the last checkpoint, which is at the observation deck on the top.
-
If the player wants to check their progress, they can locate the closest beam and use Batclaw to ascend, providing a better view of the entire puzzle.
Blockout screenshots:
-
The puzzle in the reservoir, standing at the edge of the observation deck:
-
Solving the puzzle in the gigantic puzzle area:
-
The player should be able to see a big question mark (green part) if the bridges are in the correct direction:
Design point:
-
Deliver the concept of the contrast between small and big puzzle sizes.
-
Three different ways to rotate the bridge, challenging the player’s puzzle thinking.
-
Allow the player to check their current progress anytime. (top-down view)


